cking the power of dynamic remarketing for retail: A step-by-step guide //
As a Google Canada performance specialist with over six years’ experience, I have seen first-hand how retargeting can transform businesses, particularly in the retail sector. dynamic marketing is one of the most effective retargeting methods. It allows you to reach potential customers who are interested in your product but have not yet made a purchase.
I will share best practices on how to implement dynamic remarketing in retail businesses. Following these guidelines will give you a solid foundation for creating a dynamic Google Ads remarketing campaign that targets your audience with personalized ads and increases brand visibility.
What is dynamic remarketing in retail?
Google dynamic advertising allows retailers to display customized product ads for users who previously interacted on their website or app. Google’s advertising platform allows retailers to create personalized ads displaying products users have previously added to their cart or viewed.
The ads are tailored and highly relevant to the individual users based on data like demographics and interests, as well as their website or mobile app usage.
Google Search, YouTube and Gmail are just a few of the millions of websites, apps and websites that Google partners with.
Benefits of dynamic remarketing in retail
Retailers can use dynamic remarketing to increase conversions, and revenue.
It can increase customer loyalty and sales by reminding customers of products that they previously showed interest in.
Google dynamic remarketing is an effective tool for retailers who want to boost their advertising. Its real-time bid system and advanced targeting capabilities are a great combination.
How to enable dynamic remarketing for Google Ads
Set up dynamic remarketing in your retail business using these six easy steps.
Step 1: Create an account with Google Ads
Create a Google Ads Account before you can set up dynamic remarketing with Google Tag Manager. You can skip this step if you already have an account with Google Ads.
If not, visit the Google Ads home page to create a brand new account. You will need to enter some basic details about your business such as the URL of your website and your location.
“}” data-sheets-userformat=””2″:1049089,”3″:”1″:0,”12″:0,”23″:1″ data-sheets-textstyleruns=””1″:0″1″:22,”2″:”2″:”1″:2,”2″:1136076,”9″:1″1″:85″ data-sheets-hyperlinkruns=””1″:22,”2″:”https://marketing.wordstream.com/WSLIQContentDLAccountStructure.html?cid=Web_Any_InContentTextLink_PPC_LastAccountStructureGuide_Download””1″:85″>
This is the last guide you’ll ever need to Google Ads account structure
Step 2: Add products to the Merchant Center
A product-feed is one of the most important steps in setting up dynamic remarketing using Google Ads. A product feed is basically a spreadsheet containing all relevant information about your product, such as its prices, images and descriptions. Google Ads needs this data to know which products are being viewed by customers and to show relevant ads for other products.
It’s easy to create a product feed. Create your product feed using any spreadsheet or CSV format, and then upload it to the Google Merchant Center. (Create a Merchant Center Account here). This ensures your product data will be accurately and consistently displayed to Google Ads. You can then create dynamic remarketing campaign that will reach the right customer at the right moment.
It may seem difficult to create a feed of your products (especially if there are many), but it can be made easier for certain platforms, especially ecommerce sites. CMS platforms such as Shopify or WordPress (running WooCommerce), for example, have features which can automatically add your products to Google Merchant Center.
A Google Ads Shopping Feed example.
You can integrate the Shopify Store with the Merchant Center using the API method. This method eliminates the need for traditional feeds and allows your product data to be automatically synced between the two platforms. This feature makes it easier for ecommerce businesses to implement dynamic marketing using Google Ads. It eliminates the need for manually entering data and ensures product information is up-to date.
WooCommerce allows you to use rich results when your products have schema.org structured information (for an easy solution, check out Yoast). Merchant Center can crawl your site and pull up all your products automatically without needing a feed. This feature makes it easier for businesses that are ecommerce to implement dynamic marketing using Google Ads.
Important Note: In order for Google Ads to use your product feed when creating dynamic remarketing campaign, you must link your Merchant Center Account to your Ads Account. This link lets Google Ads know that you can select a product when creating a dynamic remarketing campaigns.
Add the data layer
Add the data layer to you website as a first step in setting up dynamic remarketing. The Data Layer is where you enter information about the product that the user has viewed. This includes the ID (which should match the ID from your Merchant Center feed), the value (the final order and shopping cart value can be included), and the page category. This information is passed to Google Ads and your remarketing tag.
How does a Data Layer transmit this information to Google Ads? When a user interacts on your website, a trigger event is created. The complete event snippet will not appear automatically in your tracking tools. However, you can install a Data Layer to push relevant data from your products onto your Data Layer.
Let’s say, for example, that a user has viewed two different products on your site. The event snippet will include the price (value) and the IDs of products viewed. Data Layer will then send the data to Google Ads. This allows you to create dynamic remarketing campaigns which target the correct customers with the appropriate products.
The event names you use in your Data Layer code are important, because they describe the exact event that is being measured. The code below uses the “add_to_cart”, event, to track the user adding a product to the cart. Google Ads will use the event name to create user lists.
If you already have Google Tag Manager installed (if not, refer to the Google Help Center article), then the next step would be to add the Data Layer code that is customized for your site overthe GTM code.
“}” data-sheets-userformat=””2″:1053313,”3″:”1″:0,”10″:2,”12″:0,”15″:”Arial”,”23″:1″ data-sheets-textstyleruns=””1″:0″1″:33,”2″:”6″:1″1″:39″1″:71,”2″:”2″:”1″:2,”2″:1136076,”9″:1″1″:105″ data-sheets-hyperlinkruns=””1″:71,”2″:”https://www.wordstream.com/google-adwords?cid=Web_Any_InContentTextLink_PPC_AWGrader_AWGrader””1″:105″>
Step 4: Create the Google Ads Remarketing Tag with GTM
Follow these easy steps to set up Google Ads Remarketing Tags in your Google Tag Manager Account:
- Login to your Google Tag Manager Account.
-

-
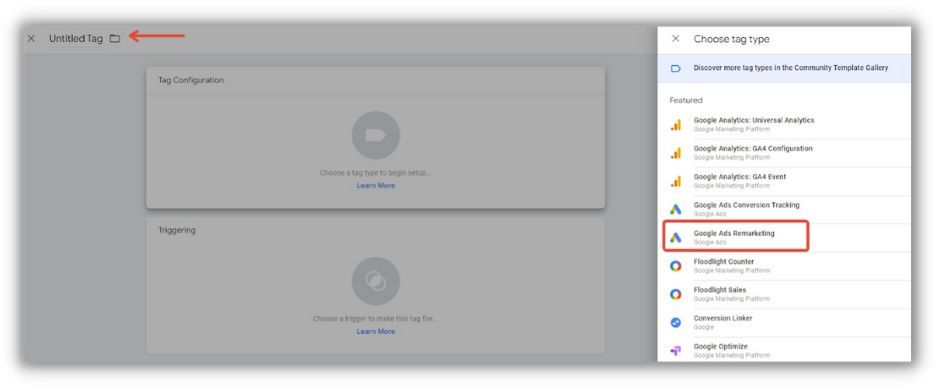
- Click on “Audience manager” under Shared Library in Google Ads. Click on “Tools & Settings”, then “Shared Library” in Google Ads.
- Choose “Your data sources” from the left. Click on “Google Ads Tag” and then “Set Up Tag”.
-
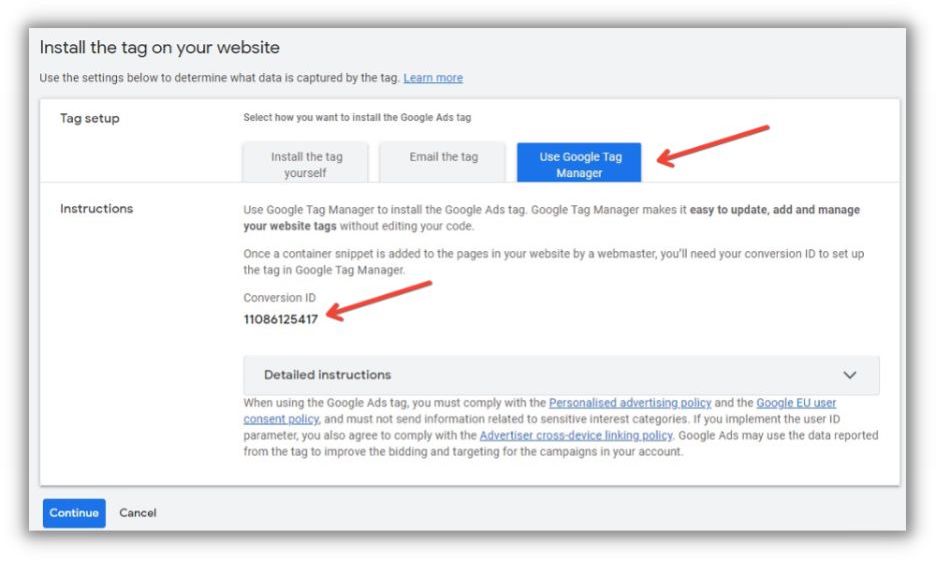
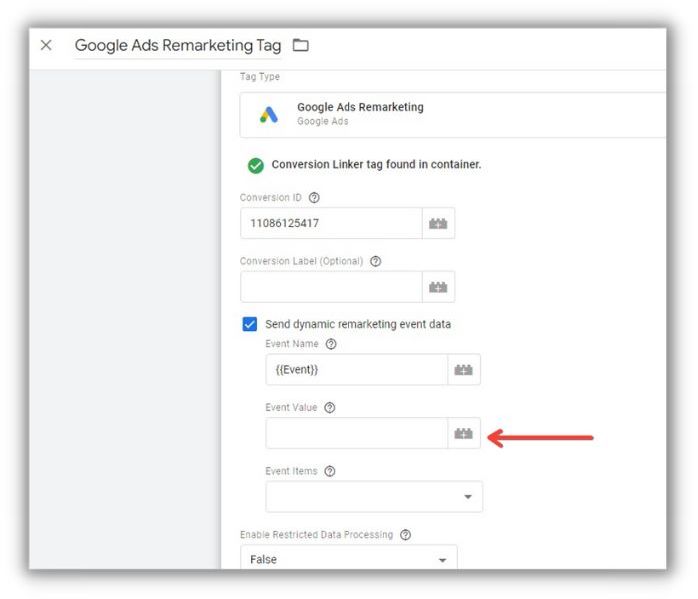
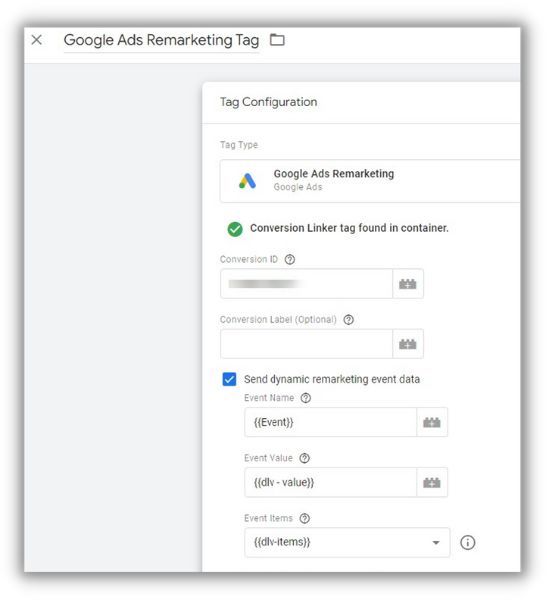
- Copy the Conversion ID, and paste it in the Conversion ID field of the Google Ads Remarketing Tag.
- Send dynamic remarketing data by selecting the option.
Step 5: Create a dynamic Remarketing Tag
You need to make your Remarketing Tag interactive if you want to use custom parameters in your Google Ads Tag for dynamic remarketing.
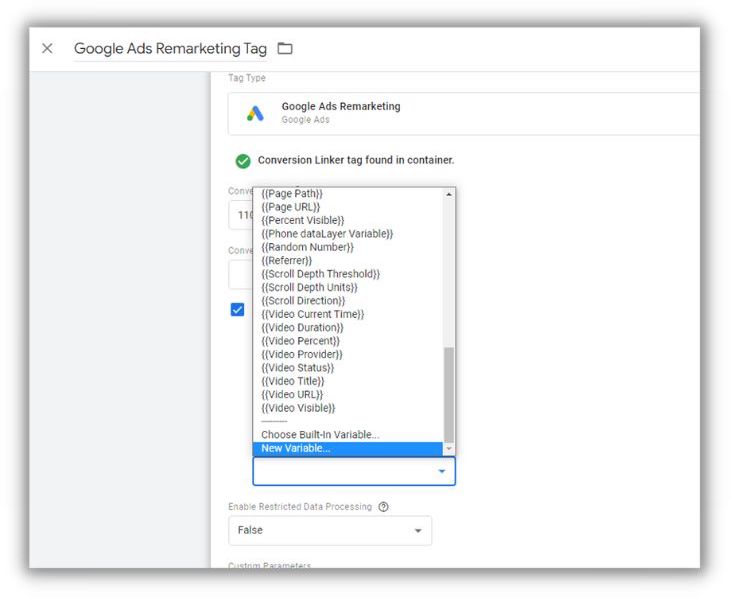
- Select the variable “Event” which is indicated by a gear icon.
-
Click on the “+” icon located next to the text box. Click on the “+”, located next to text box.
- Click the plus sign in the upper right corner to continue. Click on “Choose variable type” to start the setup …” Give the variable a unique name, such as “dlv-value”.
- Assign the name of the Data Layer Variable to the code from your website. As an example, we used “value” as the name of the Data Layer Variable. So, assign that name to Data Layer Variable.
-
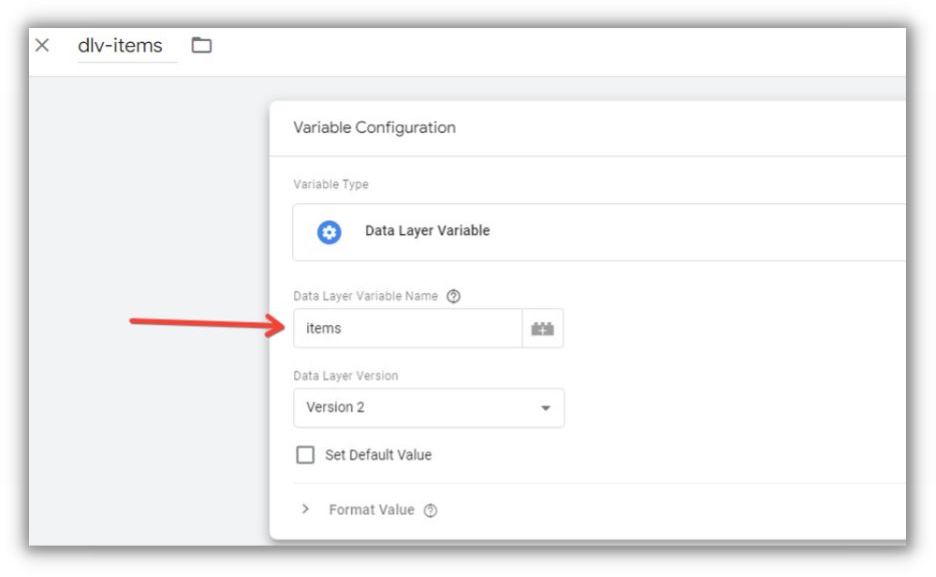
You will need to complete this step by filling in the Event Items. You can find the items array in the Data Layer, and retrieve it using a Data Layer variable just like you did for the Value Data Layer Variable. Then, click on “New Variable”. Click on “Choose variable type” to start the setup …” Name it “dlv items” and then click “Choose Variable Type”.
-
Assign the name of your site to the Data Layer Variable. As an example, we have used the name “items”, so assign this name to the Data Layer Variable.
-
Step 6: Create an event in GTM to trigger your dynamic Remarketing Tag
You want to activate the Remarketing Tag whenever certain events happen, like a product view or search, a category list view, an add to cart action, or a purchase. In order to achieve this, you will need to create an event trigger which only activates when the predefined events occur.
Start by checking the “Use Regex Matching” option. This tool allows us to combine an “or” with a pipe. You can then copy all of your predefined event names from the Google documentation and separate them with the pipe symbol, like so: view_search_results|view_item_list|view_item|add_to_cart|purchase
Your Tag will be activated only when a visitor passes through the various remarketing activities (think of these as the steps that lead down to the lower half of ‘s marketing funnel). Save the trigger by giving it a name.
Important Notice:To maximize retargeting and flexibility when creating audiences, setting up a standard remarketing tag in addition to the dynamic remarketing tag you created is a good idea. Create a new GTM Remarketing Tag using the same ID conversion as the dynamic Tag. Do not add any Data Layer custom events to this tag.
Set the trigger to fire only on the pages that are triggering the dynamic Remarketing Tag. Add “custom – Remarketing Events” as an exception in the trigger.
Start with dynamic remarketing in retail
Dynamic remarketing ads can be a game changer for your business, especially when it comes time to reach out to your audience. Google Tag Manager and Google Ads allow you to create personalized ads which are more likely convert customers.
Dynamic remarketing can be used to increase revenue by targeting those leads who are already interested in your product. This guide should have simplified the process of implementation for you. I hope you will use the knowledge you gain to improve your online marketing.
The six steps for setting up dynamic remarketing on Google Ads
-
Create a Google Ads Account
-
Add your products to the Merchant Center
-
Add Data Layer
-
Create Google Ads Remarketing tags in GTM
-
Make Your Remarketing Tag Dynamic
-
Create an event in GTM to trigger your dynamic remarketing tag
What are you still waiting for? Create your dynamic remarketing Ads in Google Ads!
The post Unlocking Dynamic Remarketing Power for Retail: Step-by-Step Guide first appeared on .